Documentations
- Quick Start
- Set up your Team
- Task Management
- Dashboard
- Categorizations
- Lead Scoring
- Client Management
- Manage Entity
- Contacts
- Add Contacts
- Edit Contact Profile
- Bulk Edit Contacts
- Contact History
- Form Submissions Contacts
- Add Notes to Contacts
- Associate Appointments with Contacts
- Contacts – Call History
- Read Emails Associated with Contacts
- Manage Documentation Associated with Contacts
- Manage Duplicate Contacts Entries
- Monitor Lead Score Logs of Contacts
- Manage Quotes with Contacts
- Manage Invoices with Contacts
- Associate Deals with Contacts
- Associate Campaigns with Contacts
- Associate Contacts with a Company
- Assign Manager to a Contact
- Leads
- Add Leads
- Edit Lead Profile
- Bulk Edit Leads
- Lead History
- Form Submissions Leads
- Add Notes to Leads
- Associate Appointments with Leads
- Read Emails Associated with Leads
- Manage Documentation Associated with Leads
- Manage Duplicate Leads Entries
- Monitor Lead Score Logs of Leads
- Manage Quotes with Leads
- Manage Invoices with Leads
- Associate Deals with Leads
- Leads – Call History
- Associate Campaigns with Leads
- Associate Leads with a Company
- Assign Manager to a Lead
- Prospects
- Add Prospect
- Edit Prospect Profile
- Bulk Edit Prospects
- Prospect History
- Form Submissions Prospect
- Add Notes to Prospects
- Associate Appointments with Prospects
- Read Emails Associated with Prospects
- Manage Documentation Associated with Prospects
- Manage Duplicate Prospects Entries
- Monitor Lead Score Logs of Prospects
- Manage Quotes with Prospects
- Manage Invoices with Prospects
- Associate Deals with Prospects
- Prospects – Call History
- Associate Campaign with Prospects
- Associate Prospects with a Company
- Assign Manager to a Prospect
- Customers
- Add Customer
- Edit Customer Profile
- Bulk Edit Customers
- Customer History
- Form Submissions – Customers
- Add Notes to Customers
- Associate Appointments with Customers
- Read Emails Associated with Customers
- Manage Documentation Associated with Customers
- Manage Duplicate Customers Entries
- Monitor Lead Score Logs of Customers
- Manage Quotes with Customers
- Manage Invoices with Customers
- Associate Deals with Customers
- Customers – Call History
- Associate Campaigns with Customers
- Associate Customers with a Company
- Assign Manager to a Customer
- Companies
- Add Company
- Edit Company Profile
- Companies History
- Add Notes to Companies
- Associate Deals with Companies
- Associate Appointments with Companies
- Manage Documentation with Companies
- Manage Quotes with Companies
- Manage Invoices with Companies
- Associate Campaigns with Companies
- Companies – Call History
- Delete Company Record
- Marketing Automation
- Emails
- Marketing Lists
- Forms
- Landing Page
- Email Campaigns
- Campaign Management
- Sales Pipeline
- Deals Management
- Add Deals
- Tagging Deals
- Switch Deals View
- Filtering Deals
- Customize Deal Stages
- Delete Deals
- Export Deals
- Add Notes to Deals
- Add Appointments to Deals
- Add Documents to Deals
- Associate Campaigns with a Deal
- Associate Quotes with a Deal
- Associate Invoices with a Deal
- Associate Products with a Deal
- Associate Deals with Pipeline
- Moving Deals Along the Sales Pipeline
- Send Emails from Deals Section
- Deals Activity Feed
- Quotes Management
- Invoice Management
- Payment Link
- Product Catalog
- Workflows
- Custom Fields
- Reports
- Logs
- System Settings
- Billing/Invoices
- Mobile App
- Integrations
Create User by User Invite
Another way to create a user effortlessly is through User Invite.
1. On the navigation bar, click the add ‘+’ shortcut button and choose ‘User’.

2. Select ‘Invite‘.

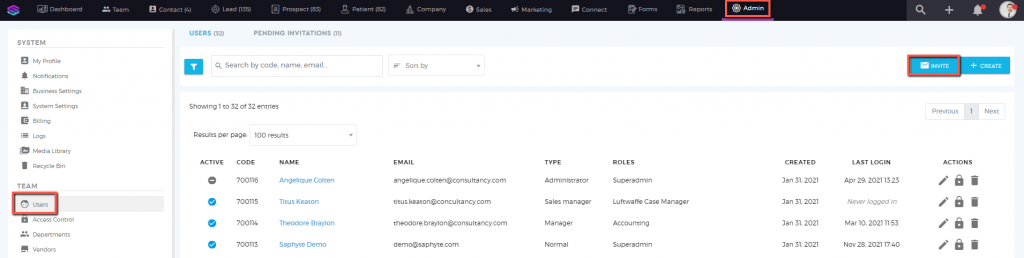
Another way to do it is to simply click on the ‘Invite‘ button available at the upper right portion of the screen under the Users section.
3. Fill out the information: invitee email address whom you want to be a user of your CRM, assign a role for this user, and define the User type. You can send multiple invites at once by clicking on 
Only users with a ‘Manager‘ or ‘Sales Manager‘ type will appear on any ‘Managers’ selection list.

4. The invitee will receive an email regarding the invite. The invitee should click the link ‘Fill out your profile’ and will be redirected to a page to complete the user profile.
5. Fill out all the information on your user profile.

6. Click the ‘Save’ button to save all the data. The invitee can now log in to the workspace using the credentials that he/she has created.